

 Implementing an inline widget
In this tutorial, you will learn how to implement an inline widget.
You will build a “placeholder” feature that allows the users to insert predefined placeholders, like a date or a surname, into the document. You will use widget utilities and conversion in order to define the behavior of this feature. Later on, you will use dropdown utilities to create a dropdown that will allow for inserting new placeholders. You will also learn how to use the editor configuration to define allowed placeholder names.
If you want to see the final product of this tutorial before you plunge in, check out the demo.
# Before you start ⚠️
This guide assumes that you are familiar with the widgets concept introduced in the Implementing a block widget tutorial. The tutorial will also reference various concepts from the CKEditor 5 architecture.
# Bootstrapping the project
The overall project structure will be similar to one described in Let’s start and Plugin structure sections of the “Implementing a block widget” tutorial.
First, install required dependencies:
Create a minimal webpack configuration:
Add an index.html page:
The application entry point (app.js):
Before building the project you still need to define the Placeholder plugin. The project will have a structure as below:
You can see that the placeholder feature has an established plugin structure: the master (glue) plugin (placeholder/placeholder.js), the “editing” (placeholder/placeholderediting.js) and the “UI” (placeholder/placeholderui.js) parts.
The master (glue) plugin:
The UI part (empty for now):
And the editing part (empty for now):
At this stage you can build the project and open it in the browser to verify if it is building correctly.
# The model and the view layers
The placeholder feature will be defined as an inline (text-like) element so it will be inserted into other editor blocks, like <paragraph>, that allow text. The placeholder will have a name attribute. This means that the model containing some text and a placeholder will look like this:
# Defining the schema
The <placeholder> element should be treated as $text so it must be defined with isInline: true. You want to allow it wherever the $text is allowed so you add allowWhere: '$text'. Finally, you will also need the name attribute.
You will also use this opportunity to import the theme file (theme/placeholder.css).
The schema is defined so now you can define the model-view converters.
# Defining converters
The HTML structure (data output) of the converter will be a <span> with a placeholder class. The text inside the <span> will be the placeholder’s name.
- Upcast conversion. This view-to-model converter will look for
<span>s with theplaceholderclass, read the<span>'s text and create model<placeholder>elements with thenameattribute set accordingly. - Downcast conversion. The model-to-view conversion will be slightly different for “editing” and “data” pipelines as the “editing downcast” pipeline will use widget utilities to enable widget-specific behavior in the editing view. In both pipelines, the element will be rendered using the same structure.
# Feature styles
As you could notice, the editing part imports the ./theme/placeholder.css CSS file which describes how the placeholder is displayed in th editing view:
# Command
The command for the placeholder feature will insert a <placeholder> element (if allowed by the schema) at the selection. The command will accept the options.value parameter (other CKEditor 5 commands also use this pattern) to set the placeholder name.
Import the created command and add it to the editor commands:
# Let’s see it!
You can rebuild the project now. You should be able to execute the placeholder command to insert a new placeholder:
This should result in:
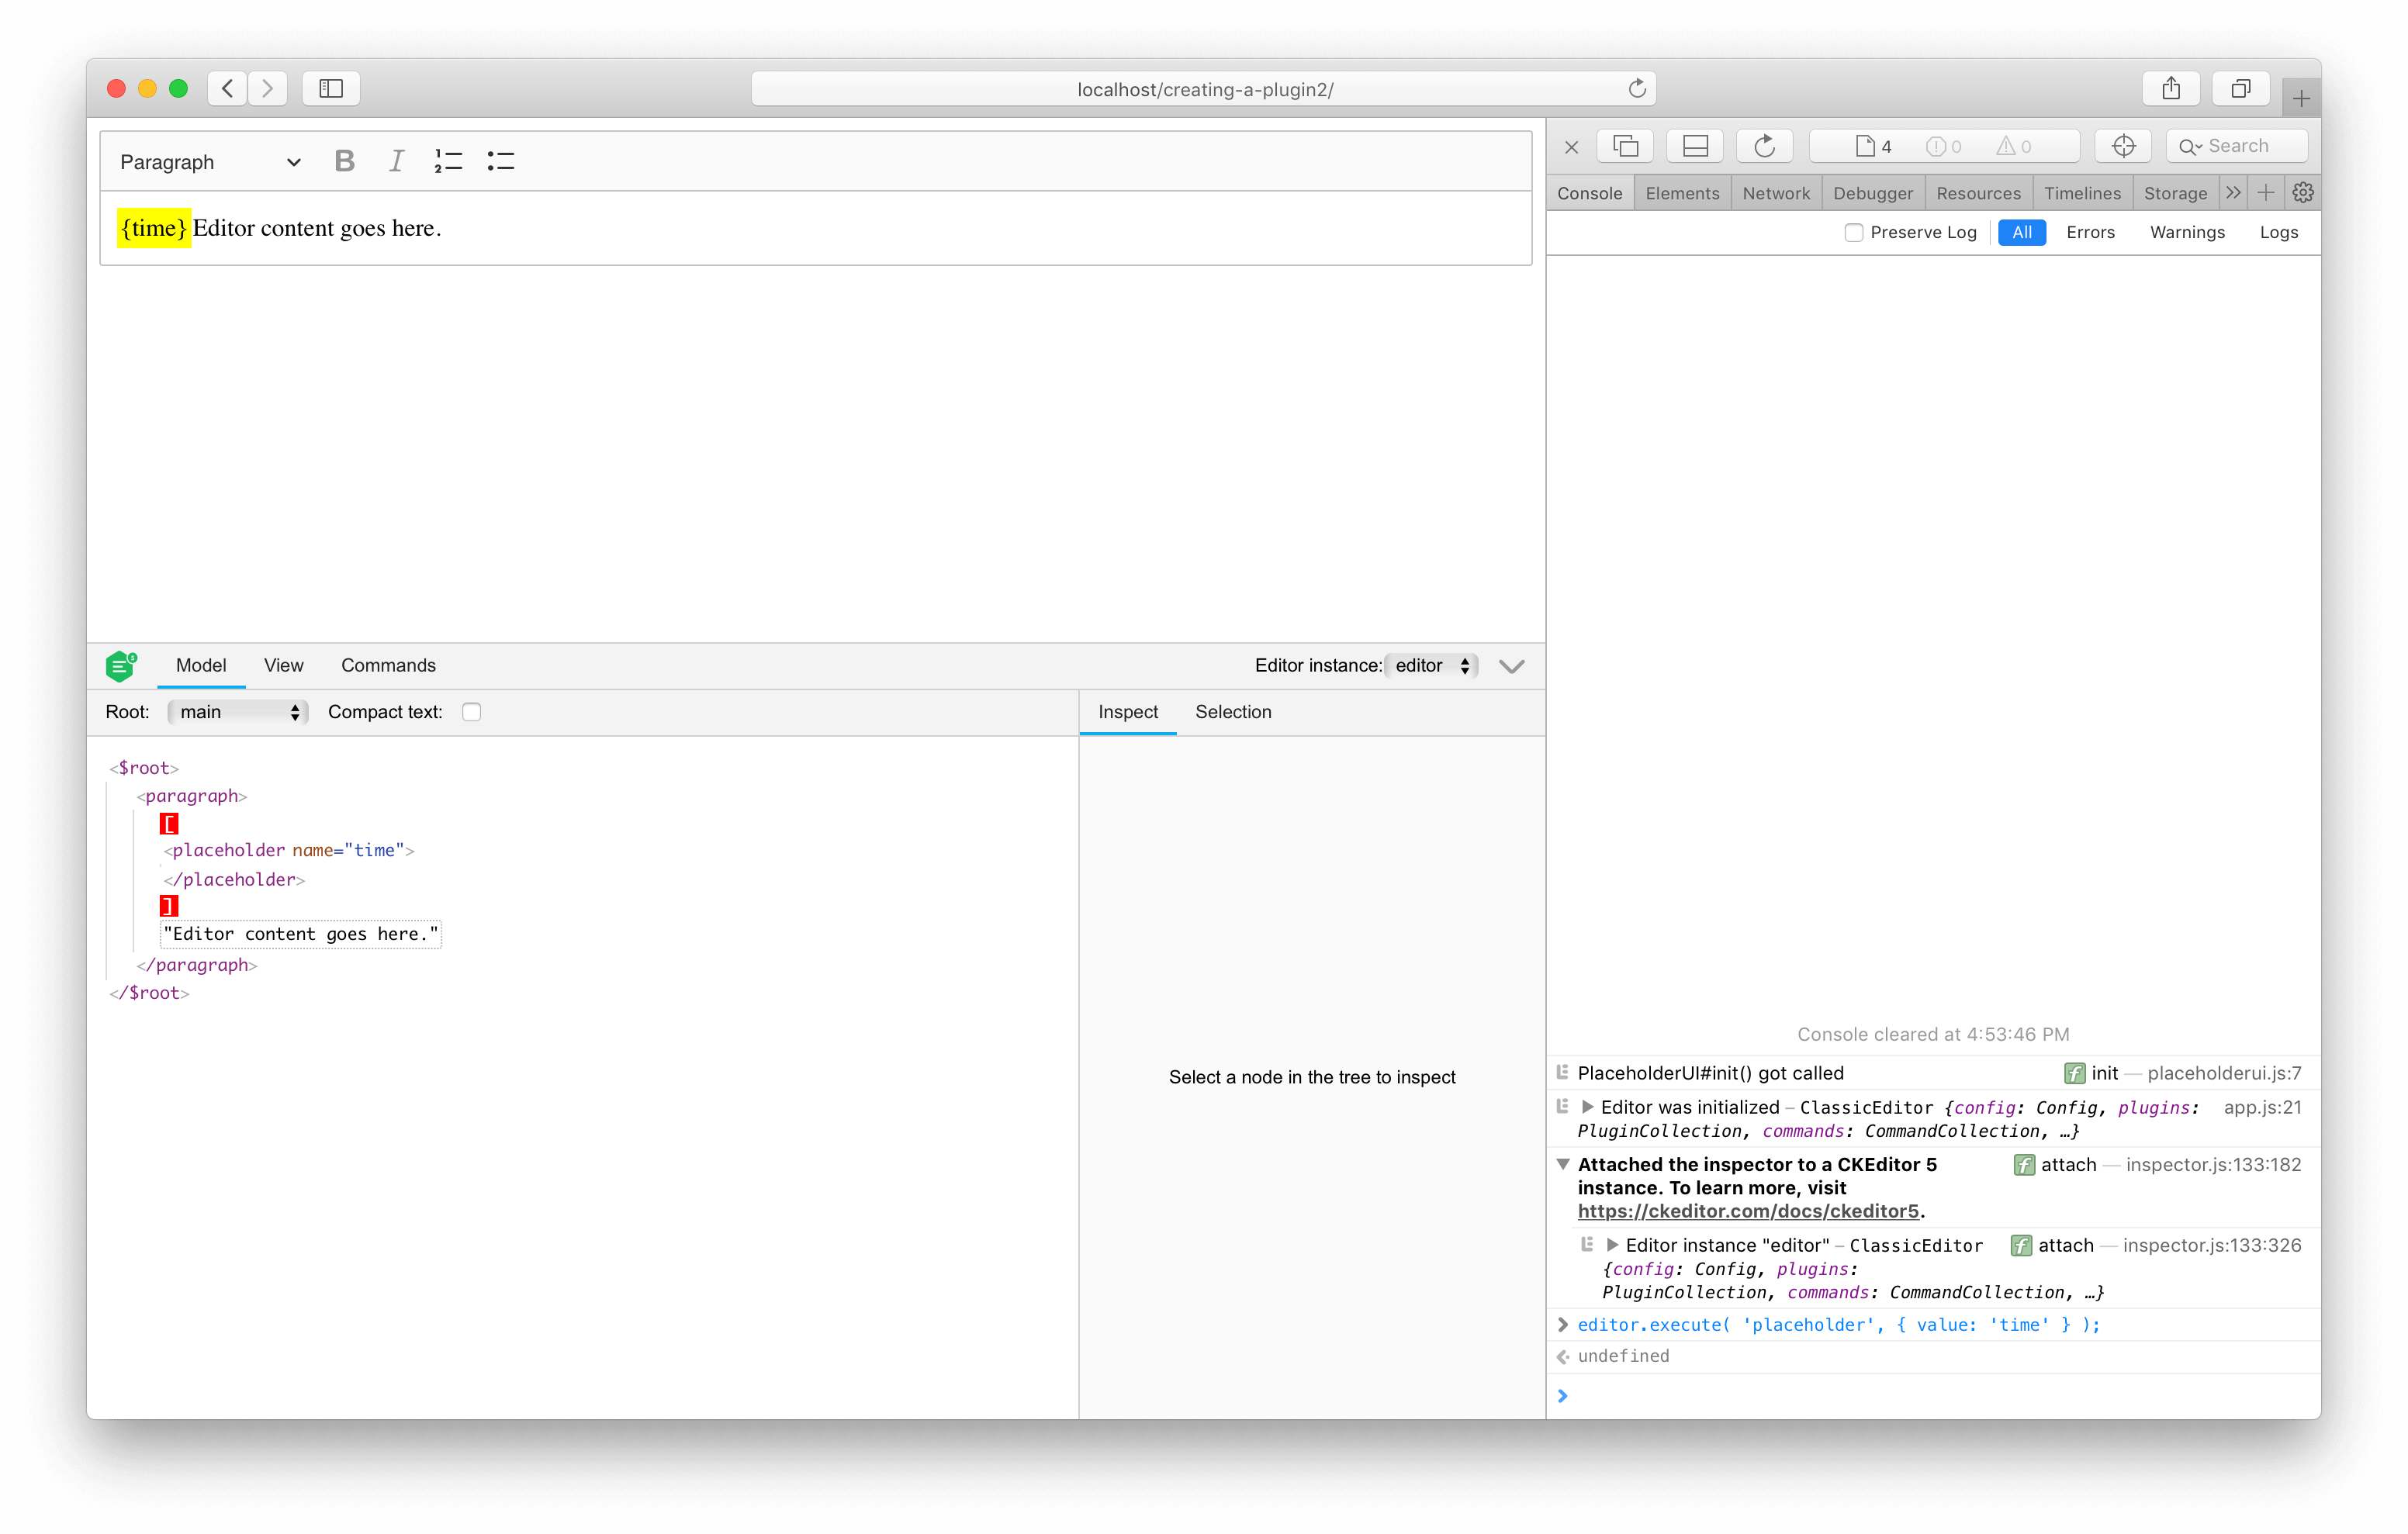
# Fixing position mapping
If you play more with the widget (e.g. try to select it by dragging the mouse from its right to the left edge) you will see the following error logged to the console:
This error is thrown because there is a difference in text node mapping between the model and the view due to the different structures:
You could say that in the view there is “more” text than in the model. This means that some positions in the view cannot automatically map to positions in the model. Namely — those are positions inside the <span> element.
Fortunately, CKEditor 5 allows customizing the mapping logic. Also, since mapping to an empty model element is a pretty common scenario, there is a ready-to-use utility viewToModelPositionOutsideModelElement() that you can use here like that:
After adding the custom mapping, the mapping will work perfectly. Every position inside the view <span> element will be mapped to a position outside the <placeholder> in the model.
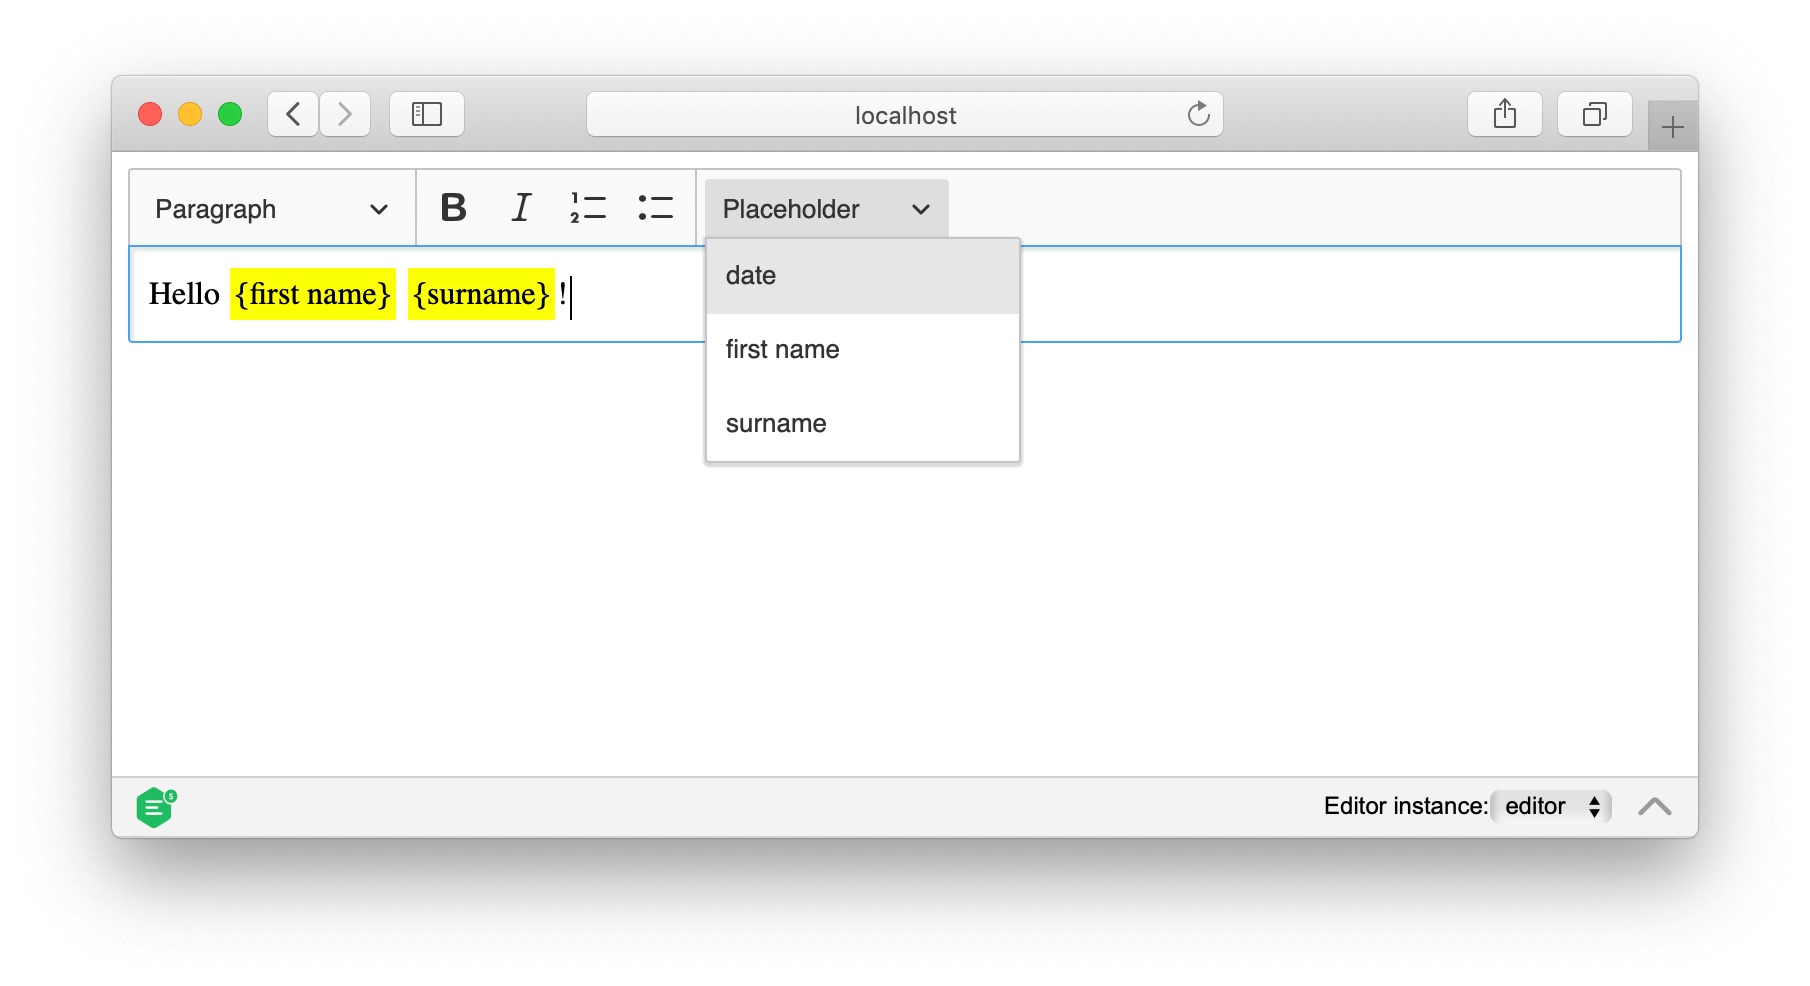
# Creating the UI
The UI part will provide a dropdown button from which the user can select a placeholder to insert into the editor.
CKEditor 5 Framework includes helpers to create different dropdowns like toolbar or list dropdowns.
In this tutorial, you will create a dropdown with a list of available placeholders.
Add the dropdown to the toolbar:
To make this plugin extensible, placeholder types will be read from the editor configuration.
The first step is to define the placeholder configuration in the editing plugin:
Now modify the UI plugin so it will read placeholder types from the configuration:
The plugin is now ready to accept the configuration. Check how this works by adding the placeholderConfig configuration in the editor’s create() method:
If you open the dropdown in the toolbar, you will see a new list of placeholders to insert.
# Demo
You can see the placeholder widget implementation in action in the editor below. You can also check out the full source code of this tutorial if you want to develop your own inline widgets.
# Full source code
The following code snippet contains a complete implementation of the Placeholder plugin (and all its dependencies) and the code to run the editor. You can paste it into the app.js file and it will run out–of–the–box:
Every day, we work hard to keep our documentation complete. Have you spotted an outdated information? Is something missing? Please report it via our issue tracker.