 Predefined CKEditor 5 builds
# Overview
Predefined CKEditor 5 builds are a set of ready-to-use rich text editors. Every “build” provides a single type of editor with a set of features and a default configuration. They provide convenient solutions that can be installed with no effort and that satisfy the most common editing use cases.
The following CKEditor 5 builds are currently available:
# Basic information
# How builds were designed
Each build was designed to satisfy as many use cases as possible. They differ in their UI, UX and features, and are based on the following approach:
- Include the set of features proposed by the Editor Recommendations project.
- Include features that contribute to creating quality content.
- Provide setups as generic as possible, based on research and community feedback.
# Use cases
Each of the builds fits several different use cases. Just think about any possible use for writing rich text in applications.
The following are some common use cases:
- In content management systems:
- Forms for writing articles or website content.
- Inline writing in a frontend-like editing page.
- Comments.
- In marketing and sales automation applications:
- Composing email campaigns.
- Creating templates.
- In forum applications:
- Creating topics and their replies.
- In team collaboration applications:
- Creating shared documents.
- Other uses:
- User profile editing pages.
- Book writing applications.
- Social messaging and content sharing.
- Creation of ads in recruitment software.
# When NOT to use predefined builds?
CKEditor 5 Framework or a custom build should be used, instead of predefined builds, in the following cases:
- When you want to create your own text editor and have full control over its every aspect, from UI to features.
- When the solution proposed by the builds does not fit your specific use case.
In the following cases CKEditor 4 should be used instead:
- When compatibility with old browsers is a requirement.
- If CKEditor 4 contains features that are essential for you, which are not available in CKEditor 5 yet.
- If CKEditor 4 is already in use in your application and you are still not ready to replace it with CKEditor 5.
# Download options
There are several options to download predefined CKEditor 5 builds:
# CDN
Predefined CKEditor 5 builds can be loaded inside pages directly from CKEditor CDN, which is optimized for worldwide super-fast content delivery. When using CDN no download is actually needed.
# npm
All predefined builds are released on npm. Use this search link to view all official build packages available in npm.
Installing a build with npm is as simple as calling one of the following commands in your project:
CKEditor 5 will then be available at node_modules/@ckeditor/ckeditor5-build-[name]/build/ckeditor.js. It can also be imported directly to your code by require( '@ckeditor/ckeditor5-build-[name]' ).
# Online builder
The online builder lets you download CKEditor 5 builds and also allows you to create your own, customized builds (with a different set of plugins) in a few easy steps, through a simple and intuitive UI.
# Zip download
Go to the CKEditor 5 download page and download your preferred build. For example, you may download the ckeditor5-build-classic-32.0.0.zip file for the classic editor build.
Extract the .zip file into a dedicated directory inside your project. It is recommended to include the editor version in the directory name to ensure proper cache invalidation once a new version of CKEditor 5 is installed.
# Included files
ckeditor.js– The ready-to-use editor bundle, containing the editor and all plugins.ckeditor.js.map– The source map for the editor bundle.translations/– The editor UI translations (see Setting the UI language).README.mdandLICENSE.md
# Loading the API
After downloading and installing a predefined CKEditor 5 build in your application, it is time to make the editor API available in your pages. For that purpose, it is enough to load the API entry point script:
Once the CKEditor script is loaded, you can use the API to create editors in your page.
The build/ckeditor.js file is generated in the UMD format so you can also import it into your application if you use CommonJS modules (like in Node.js) or AMD modules (like in Require.js). Read more in the Basic API guide.
# Available builds
# Classic editor
Classic editor is what most users traditionally learnt to associate with a rich-text editor — a toolbar with an editing area placed in a specific position on the page, usually as a part of a form that you use to submit some content to the server.
During its initialization the editor hides the used editable element on the page and renders “instead” of it. This is why it is usually used to replace <textarea> elements.
In CKEditor 5 the concept of the “boxed” editor was reinvented:
- The toolbar is now always visible when the user scrolls the page down.
- The editor content is now placed inline in the page (without the surrounding
<iframe>element) — it is now much easier to style it. - By default the editor now grows automatically with the content.
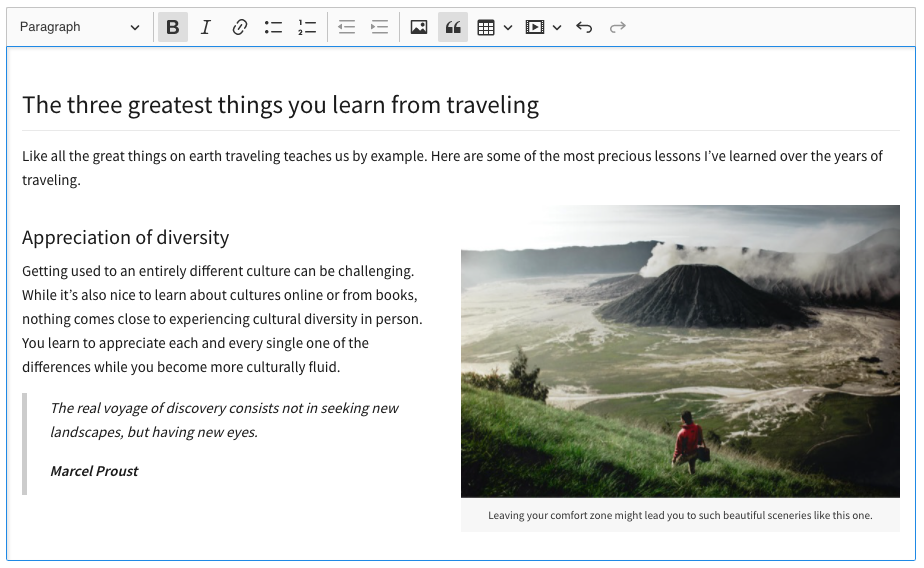
To try it out online, check the classic editor example.
# Installation example
In your HTML page add an element that CKEditor 5 should replace:
Load the classic editor build (here, the CDN location is used):
Call the ClassicEditor.create() method.
Full code example:
# Inline editor
Inline editor comes with a floating toolbar that becomes visible when the editor is focused (e.g. by clicking it). Unlike classic editor, inline editor does not render instead of the given element, it simply makes it editable. As a consequence the styles of the edited content will be exactly the same before and after the editor is created.
A common scenario for using inline editor is offering users the possibility to edit content in its real location on a web page instead of doing it in a separate administration section.
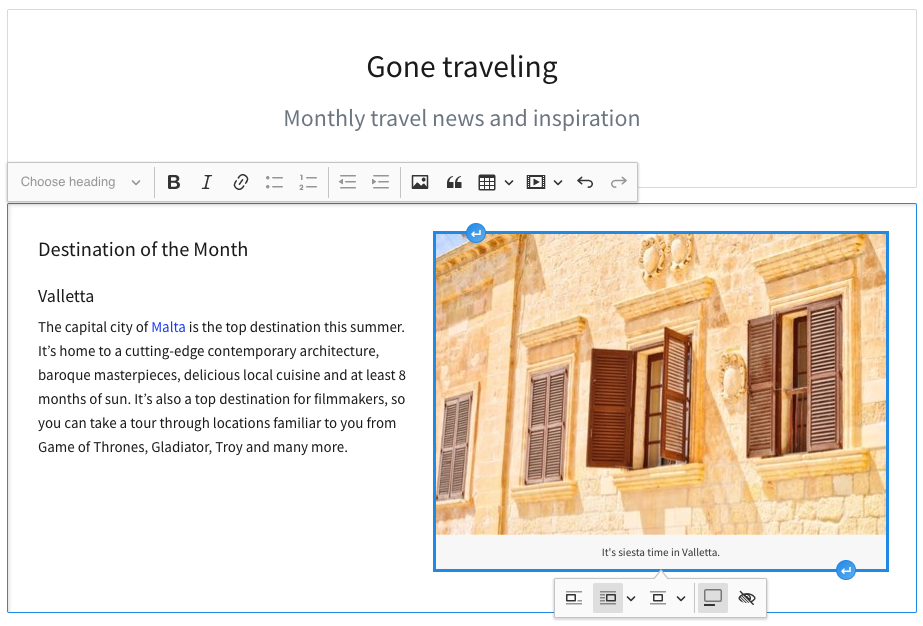
To try it out online, check the inline editor example.
# Installation example
In your HTML page add an element that CKEditor 5 should make editable:
Load the inline editor build (here, the CDN location is used):
Call the InlineEditor.create() method.
Full code example:
# Balloon editor
Balloon editor is very similar to inline editor. The difference between them is that the toolbar appears in a balloon next to the selection (when the selection is not empty):
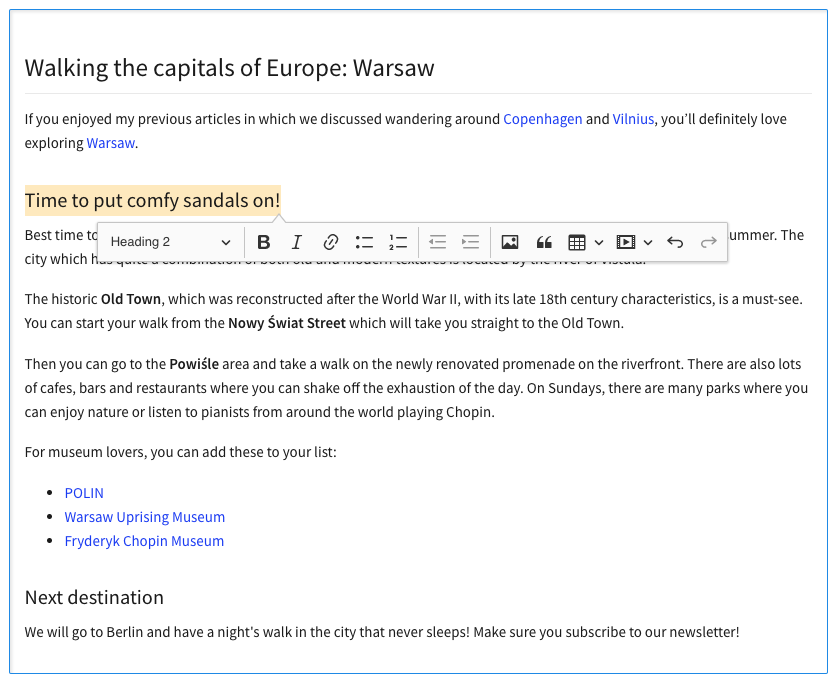
To try it out online, check the balloon editor example.
# Installation example
In your HTML page add an element that CKEditor 5 should make editable:
Load the balloon editor build (here CDN location is used):
Call the BalloonEditor.create() method.
Full example:
# Balloon block editor
Balloon block is essentially the balloon editor with an extra block toolbar which can be accessed using the button attached to the editable content area and following the selection in the document. The toolbar gives an access to additional, block–level editing features.
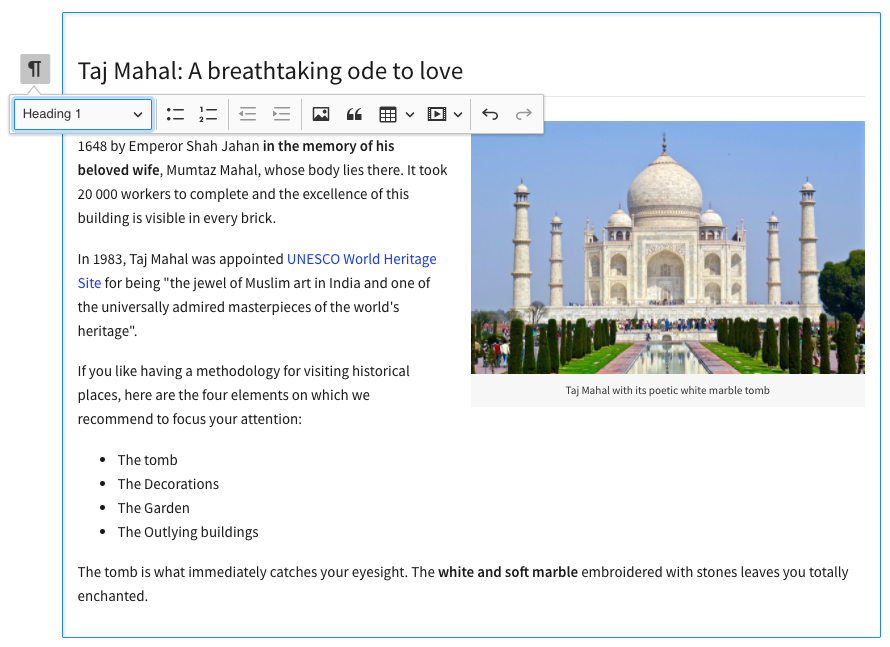
To try it out online, check the balloon block editor example.
# Installation example
In your HTML page add an element that CKEditor 5 should make editable:
Load the balloon block editor build (here, the CDN location is used):
Call the BalloonEditor.create() method.
Note: You can configure the block toolbar items using the config.blockToolbar option.
Full code example:
# Document editor
The document editor is focused on rich-text editing experience similar to the native word processors. It works best for creating documents which are usually later printed or exported to PDF files.
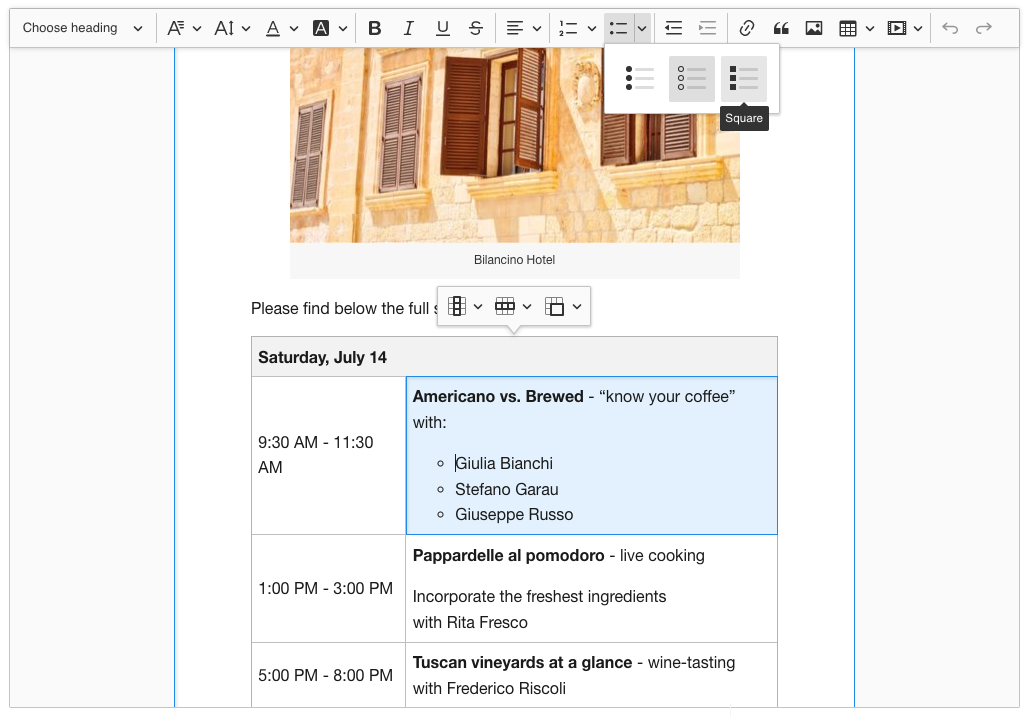
To try it out online, check the document editor example.
# Installation example
Load the document editor build (here, the CDN location is used):
Call the DecoupledEditor.create() method. The decoupled editor requires you to inject the toolbar into the DOM and the best place to do that is somewhere in the promise chain (e.g. one of the then( () => { ... } ) blocks).
The following snippet will run the document editor but to make the most of it check out the comprehensive tutorial which explains step—by—step how to configure and style the application for the best editing experience.
Full code example:
# Build customization
Every build comes with a default set of features and their default configuration. Although the builds try to fit many use cases, they may still need to be adjusted in some integrations. The following modifications are possible:
- You can override the default configuration of features (e.g. define different image styles or heading levels).
- You can change the default toolbar configuration (e.g. remove undo/redo buttons).
- You can also remove features (plugins).
Read more in the Configuration guide.
If a build does not provide all the necessary features or you want to create a highly optimized build of the editor which will contain only the features that you require, you need to customize the build or create a brand new one.
A build is a simple npm package (usually developed in a Git repository) with a predefined set of dependencies. Out of this repository, distribution files can be generated through the build process.
Some of the reasons for creating custom builds are:
- Adding features which are not included in the existing builds, either from a third party or custom developed.
- Removing unnecessary features present in a build.
- Changing the editor creator.
- Changing the editor theme.
- Changing the localization language of the editor.
- Enabling bug fixes which are still not a part of any public release.
If you are looking for an easy way to create a custom build of CKEditor 5, check the online builder, which allows you to create a custom build through a simple and intuitive UI.
# Requirements
In order to start developing CKEditor 5 you will require:
- Node.js 14.0.0+
- npm 5.7.1+ (note: some npm 5+ versions were known to cause problems, especially with deduplicating packages; upgrade npm when in doubt)
- Git
# Forking an existing build
Start with forking the main ckeditor5 repository (it will serve as the starting point for your customizations) and then clone your fork:
Builds are available in the packages/ directory. The directories are named ckeditor5-build-*.
For example, use the following command to get to the classic build:
To make updating easier, you may optionally add the original build repository to your Git remotes:
If you do not want to fork the official build, you can just clone it. However, you will not be able to commit and push your customizations back to GitHub.
Alternatively, instead of creating a custom build you can integrate CKEditor 5 directly from source. This option allows for even more flexibility and requires less overhead (you will not need to fork the official build). However, it requires that you fully control the webpack.config.js file (which is not that easy in some environments — for example in angular-cli or create-react-app).
It is important that you use the stable branch of a build, not the master branch. The master branch might contain changes which are not yet compatible with the versions of CKEditor 5 source packages that were published on npm.
# Build anatomy
Every build contains the following files:
build/ckeditor.js– The ready-to-use editor bundle, containing the editor and all plugins.src/ckeditor.js– The source entry point of the build. Based on it thebuild/ckeditor.jsfile is created by webpack. It defines the editor creator, the list of plugins and the default configuration of a build.webpack-config.js– The webpack configuration used to build the editor.
# Customizing a build
In order to customize a build you need to:
- Install missing dependencies.
- Update the
src/ckeditor.jsfile. - Update the build (the editor bundle in
build/).
# Installing dependencies
First, you need to install dependencies which are already specified in the build’s package.json:
Then, you can add missing dependencies (i.e. packages you want to add to your build). The easiest way to do so is by typing:
This will install the package and add it to package.json. You can also edit package.json manually. Keep in mind, however, that all packages (excluding @ckeditor/ckeditor5-dev-*) must have the same version as the base editor package.
Due to the non-deterministic way how npm installs packages, it is recommended to run rm -rf node_modules && npm install when in doubt. This will prevent some packages from getting installed more than once in node_modules/ (which might lead to broken builds).
You can also give Yarn a try.
# Updating build configuration
If you added or removed dependencies, you will also need to modify the src/ckeditor.js file.
Every plugin that you want to include in the bundle should be added at this stage. You can also change the editor creator and specify the default editor configuration. For instance, your webpack entry file (src/ckeditor.js) may look like this:
# Rebuilding the bundle
After you changed the webpack entry file or updated some dependencies, it is time to rebuild the bundle. This will run a bundler (webpack) with a proper configuration (see webpack.config.js).
To do that, execute the following command:
You can validate whether your new build works by opening the sample/index.html file in a browser (via HTTP, not as a local file). Make sure to clear the cache.
# Updating the build
You may decide to update your build at any time. Since it is a fork of the official build, you can simply merge the changes that happened meanwhile in that build, using Git commands:
You should handle eventual conflicts and verify the merged changes. After that, just follow the previous instructions for creating your build and test it.
It is recommended to run rm -rf node_modules && npm install after you fetched changes from the upstream or updated versions of dependencies in package.json manually. This will prevent npm from installing packages more than once (which may lead to broken builds).
# Publishing your builds
If you think that your custom builds can be useful to others, it is a great idea to publish them on GitHub and npm. When doing so, just be sure to give them meaningful names that would fit the ckeditor5-build-(the name) pattern, making them easy to find. To avoid conflicts with other existing builds you can use scoped packages. We also recommend using the “ckeditor5” and “ckeditor5-build” keywords to make your build easier to find.
After your build is out, ping us on Twitter!
Every day, we work hard to keep our documentation complete. Have you spotted an outdated information? Is something missing? Please report it via our issue tracker.

